Have you ever found yourself in a situation where you wished you could send a text message, but the timing just wasn’t ideal? Whether it’s too early in the morning, late at night, or you want to plan ahead for a few days from now, the need to schedule a text message becomes apparent. Waiting to send it risks forgetting about it altogether. Imagine a solution where you can compose your message at your convenience and have it sent precisely when you want it to be delivered. In this guide, we explore the art of scheduling text messages, offering seamless methods for both Android and iOS users. No more missed opportunities or forgotten messages—just a simple, effective way to ensure your messages are always timely. Plus, we delve into efficient strategies for businesses looking to send scheduled messages to customers, irrespective of the mobile device they use.
About Scheduling A Text
Scheduling a text message involves the ability to compose a message in advance and set a specific date and time for it to be sent automatically. This feature proves to be highly useful in various scenarios, such as sending birthday wishes, setting up reminders, or ensuring that important messages reach recipients at the most convenient times. The process essentially allows users to plan and automate the delivery of messages, eliminating the need to remember or send them manually. As we delve into the methods for both iPhone and Android devices in the following sections, understanding the basic concept of scheduling text messages lays the foundation for mastering this practical and time-saving feature.
How To Schedule A Text on iPhone?
When it comes to scheduling text messages on your iPhone, the process may seem elusive at first, but fear not – we’ve got you covered. This section will walk you through various methods to seamlessly schedule your messages, ensuring you never miss an opportunity to send a timely text. Whether you prefer to use native iPhone features or explore third-party applications, our guide will help you master the art of scheduling messages on your iOS device.
1. By Using Shortcuts Automation
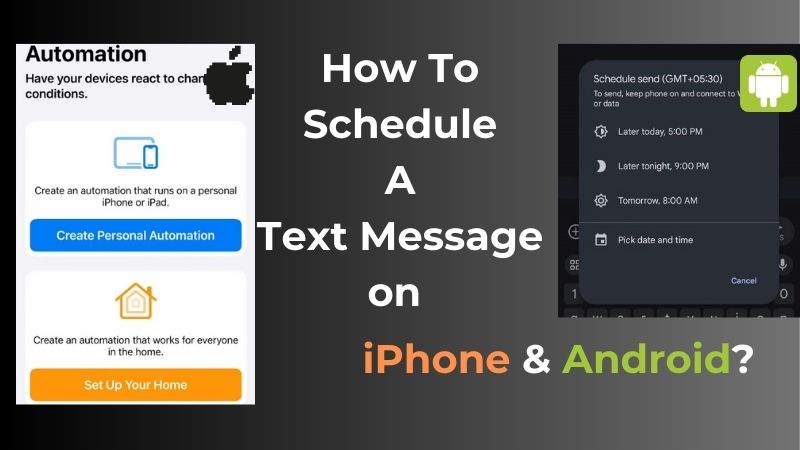
The Shortcuts app on your iPhone opens up a realm of possibilities, and one such capability is scheduling text messages. This feature is available for users with iOS 13 or later; if you’re on an earlier version, you’ll need to download the free Shortcuts app from the App Store. Here’s a step-by-step guide on using the Shortcuts app to schedule text messages:
- Open the Shortcuts App: Navigate to your phone’s home screen and locate the Shortcuts app. Tap to open it.
- Access the Automation Tab: At the bottom of the Shortcuts app, find and choose the Automation tab.
- Create Personal Automations: If you’ve never created an automation before, tap “Create Personal Automations.” For those who have, tap the ‘+‘ in the upper right corner and then select “Create Personal Automation.“

- Select Time of Day: Choose the “Time of Day” option as the trigger for your automation.

- Set Repeat Frequency: In the Repeat section, pick either Daily, Weekly, or Monthly, depending on your preference. Select the desired frequency, such as weekly on Mondays. For one-time messages, select “None.”

- Add Action: After creating your automation trigger, tap “Add Action.” From the list, select “Send Message.”

- Compose Your Message: In the Message field, type the text you want to send. Choose the recipient, and then tap Next.

- Review and Confirm: Double-check the date, time, recipient, and message details. Review the “Ask Before Running” option; toggle it if you want to run the automation without confirmation. Tap Done to finalize the automation.
- Set a Reminder for Deletion: If it’s a one-time message or you only need a recurring message for a specific duration, set a reminder to delete the automation when it’s no longer needed. This type of automation will set a recurring message.
- Delete the Automation: When the scheduled time arrives, go back to the Shortcuts app. Navigate to the message automation, slide your finger to the left, and tap Delete to remove the automation.
2. By Using iPhone Reminders App
If you prefer not to add any new applications to your device, utilizing the built-in Reminders app on your iPhone provides a straightforward workaround for scheduling text messages. While the Reminders app won’t send your message automatically, it allows you to compose your text in advance and prompts you to send it at the specified time. Here’s a step-by-step guide on using the iPhone Reminders app for scheduling messages:
- Open the Reminders App: Locate and open the Reminders app on your iPhone.
- Create a New Reminder: Tap the “+ New Reminder” option to begin creating a new reminder.
- Title Your Reminder: Give your reminder a title, representing the content of your text message.
- Compose Your Text: Type and compose your text message within the reminder. This serves as a placeholder until it’s time to send.
- Optional Details: Add any additional details to your reminder if needed.
- List Inclusion (Optional): If you use lists in the Reminders app, you can add the reminder to a specific list.
- Schedule the Reminder: Tap the calendar icon to set a schedule for your reminder.
- Complete the Setup: Click “Done” to finalize the reminder setup.
- Retrieve and Send the Message: When the reminder notification arrives, open it. Copy the composed message from your reminder and paste it into the Messages app on your iPhone.
Hit Send: After pasting the message into the Messages app, hit “Send” to dispatch your scheduled text.
3. By Using Third Party Apps
For users who prefer exploring third-party options, the App Store offers a variety of applications, such as Scheduled or Text Delay, dedicated to scheduling text messages. These apps can provide additional features, though some may require a fee for access. It’s important to note that certain apps won’t automatically send scheduled messages; instead, they prompt you with a notification to manually send the message at the designated time. If you’re interested in using the Scheduled App for text scheduling, here’s a straightforward guide:
- Download the Scheduled App: Head to the App Store, download, and install the Scheduled App on your iPhone.
- Sign Up: Add your details and complete the sign-up process within the Scheduled App.
- Navigate to Home Screen: On the app’s home screen, locate and click on the ‘+’ icon to initiate the message scheduling process.
- Choose Recipients: Select the recipients for your scheduled message within the app.
- Compose Your Message: Type out the text message you wish to schedule.
- Schedule Date: Click on ‘Schedule Date’ and choose the specific date when you want the message to be sent.
- Repeat Option (If Needed): If you want the message to be sent repeatedly, select the appropriate cadence.
- Set Reminder (Optional): Opt for a reminder if you wish to be prompted to send the message manually.
- Send Automatically (Optional): If you want the message to be sent automatically on the scheduled date, click on ‘Send Automatically’.
- Schedule Message: Finally, click on ‘Schedule Message’ to complete the process.
How To Schedule A Text on Android?
When it comes to scheduling text messages on Android, the process might vary depending on the device’s make and model. Android devices, however, offer built-in features and functionalities that allow users to schedule messages effortlessly. In this section, we’ll explore the methods for scheduling texts on Android, ensuring you have the flexibility and convenience to send messages at precisely the right times. Whether using the default messaging app or leveraging Google’s tools, you’ll find a suitable method to fit your needs. Let’s dive into the various approaches to scheduling texts on Android.
1. By Using Default Message App
If you’re looking to schedule text messages on your Android device without relying on additional apps, many default messaging apps provide this functionality. The process may slightly differ based on the specific messaging app your device uses, but generally, it involves straightforward steps. Here’s a simplified guide to scheduling texts using the default messaging app:
- Open Your Default Messaging App: Locate and open the default messaging app on your Android device.
- Select Your Recipient: Choose the recipient to whom you want to send the scheduled text message.
- Compose Your Message: Type your message as usual, and look for the ‘+’ option or any symbol indicating additional features.
- Access Schedule Send: Click on the ‘+’ option, and you should find ‘Schedule Send’ among the available options.
- Set Date and Time: Click on ‘Schedule Send’ and choose the specific date and time when you want the message to be sent.
- Save and Complete: Once you’ve set the schedule, hit ‘Save’ or any equivalent option to confirm and complete the scheduling process.
2. By Using Google Message App
Utilizing the Google Messages app on your Android device provides a convenient and integrated way to schedule text messages without the need for third-party applications. Here’s a step-by-step guide to scheduling texts using the Google Messages app:
- Open the Google Messages App: Locate and open the Google Messages app on your Android device.
- Create a New Message: Start by creating a new message within the app.
- Choose Recipient(s): Select the recipient or recipients for your scheduled text message.
- Compose Your SMS: Compose the content of your SMS message as you normally would.

- Long-Press the “Send” Arrow: Instead of tapping the “Send” arrow immediately, long-press on it.
- Access Scheduled Send Option: A menu will appear, presenting the option “Scheduled send.” Tap on this option.

- Choose Date and Time: Select one of the suggested date and time combinations provided, or opt for a custom date and time by tapping “Select date and time.”

- Save Your Scheduled Message: After setting the desired date and time, tap “Save” to confirm and save your scheduled message.
3. By Using Google Calendar
Similar to the workaround available on the iPhone’s Reminders app, Google Calendar provides an alternative method for scheduling text messages on your Android device. While this method won’t automatically send the text, it serves as a reminder for you to send it manually. Here’s a simple guide for scheduling texts using Google Calendar:
- Open the Calendar App: Locate and open the Calendar app on your Android device.
- Create a New Event: Initiate the process by creating a new event within the calendar.
- Choose Date and Time: Select the desired date and time for your scheduled text message, and use the event entry to write your text message.
- Set an Alarm: While creating the event, set an alarm or reminder for the specified date and time.

- Wait for the Reminder: When the set time arrives, the calendar app will trigger the alarm as a reminder.
- Copy and Paste the Content: Once the reminder goes off, open the calendar entry, copy the text message content, and paste it into the messaging platform of your choice.
- Send Manually: Send the text to the recipient(s) by hitting the send button within the messaging platform.
Schedule A Text Message – FAQs
Ans: The ability to schedule messages for multiple recipients depends on the specific messaging app or method you are using. Some apps may support group text scheduling, while others may require individual scheduling.
Ans: Default messaging apps on both iPhone and Android devices often have scheduling features. However, some limitations may apply, such as the lack of advanced options or recurring scheduling. Third-party apps can provide additional features.
Ans: In most cases, scheduled messages appear in the recipient’s inbox like any other text message. There is usually no indication that the message was scheduled, contributing to a seamless and natural communication experience.
Ans: In general, if you follow the correct steps and settings, scheduled messages should be sent at the specified time. However, it’s always a good idea to double-check your settings and ensure the message is scheduled correctly.
Conclusion
In conclusion, scheduling text messages is a valuable tool for iPhone and Android users alike, eliminating missed opportunities and ensuring timely delivery. Whether you utilize built-in features like Shortcuts and Google Messages, explore dedicated apps like Scheduled, or leverage alternative methods like Reminders and Calendar, there’s a convenient option to suit your needs. Embrace the power of scheduling to send thoughtful messages at the perfect moment, leaving a lasting impression on your recipients without sacrificing your own time and planning.
Credit : Source Post


